
Get guides like this in your inbox every Thursday
Read it here free, or subscribe and get every new one, plus the AI news that matters.
Free, plus 4 starter guides when you join. One email a week. Unsubscribe anytime.
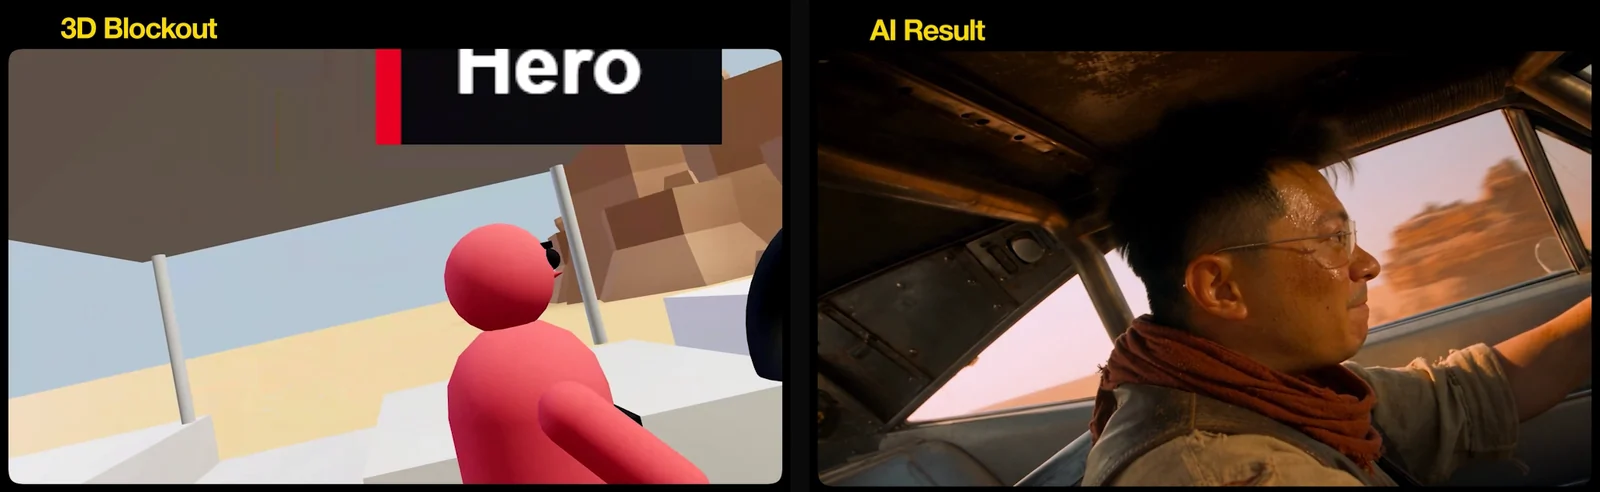
What is a 3D blockout for AI video?
A 3D blockout is a rough 3D plan of a shot: where each character stands, how they move and where the camera goes, made before any video is generated. Morphic's 3D Scene editor builds one with simple coloured mannequins, either from a prompt to its agent or by moving things yourself. Without a plan, an AI video model has to guess all of that from text.
The Morphic workflow has four steps. Step 1: describe the scene to the agent. Step 2: fine-tune the camera by hand. Step 3: export the blockout as an MP4. Step 4: generate the final shot with Reference to Video, telling the model who each coloured mannequin is.
Building and editing a scene in Morphic costs no credits. Each agent reply uses a few credits, and the final 10-second video uses far more than the Free plan's 20 one-time credits, so you need a paid plan for the last step.
before you startWhat do you need?
- A Morphic account at morphic.com, on a paid plan for the final video.
- A current Chrome, Edge or Safari. The blockout video renders in your browser.
- Optional: a character sheet of your own hero, for a consistent face. The bonus at the end shows how to make one.
- About 20 to 30 minutes.
How does the AI know who's who?
Every character in the scene is a mannequin with a colour and a label, and both show up in the export. When you generate, you say who's who by colour: red is the hero, blue are the raiders. The model then puts the right person in the right place, facing the right way.
step 1Step 1: Describe the scene
- Open studio.morphic.com/3d, or on the Canvas click + → 3D Scene. The editor opens with a floor, a shot camera and three lights.
- Click Chat (top right). In the button at the bottom right of the prompt bar, set the mode to Automatically generate.
- Paste this prompt and press Enter. The agent builds the set, the cars, the cast and the camera move.
Build a 10-second desert car chase with two cars.

Car 1 in front: a huge raider car with a driver and one raider standing on the roof facing backward, holding a long pole.

Car 2 behind: a silver muscle car with one man driving, chasing Car 1 at full speed. At 8 seconds he pulls up alongside Car 1 on its right side.

Camera, one continuous move: start low on the road looking back at Car 2, rise up behind the roof raider at 2 seconds, swing and dive toward Car 2 at 4 seconds, arc to the driver's window for a tilted close-up at 6 seconds, and end wide on both cars side by side at 8 to 10 seconds.
Then colour your cast and play it back:
- Click the hero mannequin. In the Selection tab, click the swatch next to Color and pick red.
- Click each raider and make them blue.
- Press 3 to look through the shot camera, then Space to play.
Tip: If something looks off, just ask: "move the raider closer to the edge of the roof" or "undo that". Each agent change is one step you can undo.
Step 2: Take control by hand
The agent gives you a first draft. Now direct it yourself, down to the exact second.
- Select the shot camera.
- Drag the playhead to 3s on the timeline.
- Drag the camera lower and closer to the roof raider with the move arrows, or type exact position and lens values.
- Play it back with 3, then Space. What the shot camera sees is exactly what gets exported.
Watch for warnings. Morphic's continuity checks, at the bottom of the Animate tab, flag a camera move that crosses the 180-degree line or a character moving too fast for its walk or run. Clear them before you export.
Step 3: Export the blockout
- Click Export (top right).
- Pick 16:9, 1080p and 24 fps.
- Click Export video. It renders in your browser, so keep the tab open until the MP4 downloads.
Good to know: the export is your plan, mannequins and all, not the final video. The real shot is generated in Step 4. Your scene stays on the Canvas when you close the editor, and Cmd/Ctrl + S downloads a copy of the scene file.
Step 4: Cast by colour and generate
- Close the editor to go back to the Canvas.
- Open References in the prompt bar and add your blockout video, plus your character sheet image if you have one.
- Choose Video → Reference to Video, 10 seconds, 16:9, highest resolution.
- Paste the prompt below and press Enter.
THE RED MANNEQUIN is the hero: the exact man shown in the character reference image. Same face, same hair, same outfit. He drives the silver muscle car.

THE BLUE MANNEQUINS are desert raiders: wiry figures with sunburnt skin, faces wrapped in sun-bleached cloth, scrap-leather and tin-plate armour, dusty goggles. One crouches on the roof swinging a long pole.

Follow the reference video exactly for camera movement, car positions and timing. One continuous 10-second shot, no cuts, full intensity from the first frame. Shot on Kodak Vision3 250D, anamorphic lens, fine film grain.

The hero car is a battered silver 1970s-style muscle car with a huge exposed chrome engine and an open roll-cage cabin. The raider car is a monstrous armour-plated beast with spikes, roof rails and two tall exhaust stacks spitting fire.

Setting: a vast orange desert at harsh late afternoon, red rock formations, enormous dust clouds, heat haze.

[CONSISTENCY] Keep the hero in the silver car and the raider on the roof for the whole shot. Same faces, costumes and vehicles in every frame. Turn the mannequins into real people. The labels in the reference are only markers: show no text anywhere. Photoreal skin, heavy motion blur, roaring engines. Prioritize speed and realism over literal matching of the blockout's speed.
No character sheet? Replace the first paragraph with a short description of your hero, like "a man in his 30s with short dark hair, a rust-red scarf and a brown leather vest."
bonusBonus: put your own face in the chase
Make a character sheet first and add it as a reference in Step 4. Attach a clear photo of yourself in an image model (like Nano Banana) and paste:
character design reference sheet, single 16:9 image, left: three full-body views (front, side profile, back), right: one large chest-up close-up of the face,
the exact same person as in the reference image: same face, same features, same skin tone, same hairstyle,
styled for a desert car chase: light desert dust and sweat on the face, rust-red scarf around the neck, weathered dark brown leather vest over a torn sand-beige linen shirt with rolled sleeves, black fingerless driving gloves, dusty khaki trousers, scuffed tall leather boots,
photoreal film still, Kodak Vision3 250D, visible skin texture, same identity and outfit in every view, neutral light gray background, no text
What should you check before you generate?
- Both coloured mannequins are clearly visible through the shot camera.
- The blockout is the length you want (10 seconds) and exported at 16:9.
- Your prompt says who's who by colour.
- After generating: right person in the right car, no text on screen, same faces throughout.
What does it cost, and what are the limits?
- Building is free, generating isn't. Building and editing a scene costs no credits. Each agent reply uses a few, and the final video uses the most. In my video, the generate button showed 420 credits for the 10-second shot.
- The Free plan won't cover the final shot. It gives 20 one-time credits, and Free accounts can't buy credit packs. Check morphic.com/pricing for the current plans.
- Labels show up in the export. That's why the prompt says the labels are only markers and to show no text anywhere.
- The AI still interprets. The blockout guides positions, camera and timing, but the model fills in the details, so check every result before you use it.
Links 🔗
- Open Morphic 3D Scene — Starts a new scene on your Canvas
- Morphic 3D Scene — What it is, with Morphic's FAQ
- 3D Scene guides (Morphic docs) — Camera, characters, continuity checks and export
- 100 AI video codes — Camera moves and shot words for your prompts
- The PixVerse Workflow Pack — Another character-sheet workflow
Liked this? Get the next one in your inbox.
Every Thursday I research the latest AI systems and workflows, then break the best one down into simple steps, with prompts you can copy. Plus the AI news that changes what you can do.
Free, plus 4 starter guides when you join. One email a week. Unsubscribe anytime.